Total Pageviews

Sunday, October 8, 2017

Chicken Chili Nachos


Chicken Chili Nachos


This is one of those meals that looks really messy, but nevertheless is totally delicious. It is also one of those meals that you think is really bad for you, but actually with a few tweaks, can be loaded with good stuff that you don't have to feel guilty about eating - YAY!

After a long bike ride with the family yesterday we were ready for something delicious and satisfying for lunch, that could be put together quickly - this totally fit the bill. 

Start with a can of prepared chili.  I used Trader Joe's canned Chicken Chili, which is a favorite in this house.  Then grab a can of black beans from the pantry, rinse and drain.  Add the can of chili and the black beans to a pot on medium heat and cover. (Adding the black beans is a great way to stretch the can of chili to feed four people and reduce the sodium content per person as well).

Then turn on the broiler and get a large tray and cover it with your favorite corn tortilla chips. Top with a layer of shredded cheddar cheese and a layer of mozzarella cheese.  Put it in broiler, but keep a close eye on it, as you want the cheese to brown nicely, but not burn!

Meanwhile chop up some fresh cilantro, dice up some avocados and lastly bring out that tub of plain Greek yogurt from the fridge. Yep, you thought that white dollop on top was sour cream, but not in this house. We have made the full switch to plain Greek yogurt as a substitute and actually it's delicious creaminess brings perfect balance to this meal, and is healthful, adding extra protein and good bacteria for your gut for better digestion, among other things.

Take the chips out from the broiler and you are good to go!  Simply put some of the nachos onto a plate and then top them with some chili, some cilantro, some avocado, and a nice healthy dollop of Greek yogurt and you are in the delicious Chicken Chili Meal heaven- enjoy!


Thursday, October 5, 2017

Spaghetti (Squash) and Tomato Sauce


It's that time of year again:  Spaghetti Squash Season!  I would eat real spaghetti every single day if I could do that and not gain weight, but I haven't figured out how to do that yet, SO - until then this is my favorite pasta substitute.  It's nearly as good and definitely as versatile.  Treat it like pasta and it will behave like pasta!   Cook it Al dente and the strands will stay in tact, the sauce will stick, and you will be able to twirl it up into a fork just like real spaghetti!

Today I kept it super simple, fast, and easy.   It's fast and easy because I cooked it last night, so it's just sitting in a pyrex in the fridge waiting to becomes a delicious meal.  So this is how I do it....

I buy the Squash whole, bring it home, wash it, dry it, poke it all over the place with a sharp knife, cook it in the microwave for 6 minutes.  Then I turn it over and cook it for another 6 minutes.  (less time if it's small, perhaps more time if it's huge!)  Then I let it sit in the microwave cooling down for about an hour.  Then I pull it out, put it on a large cutting board, get my big sharp knife and cut it in half lengthwise.  I use a large spoon to scoop out the seeds, toss them into the trash, then grab my fork and start pulling the squash strands down and out of the squash and into a large bowl.  Cover it, put in fridge, now it's ready whenever you are.

So today all I had to do was scoop about 1.5 cups onto a plate, pour my sauce on right from the jar, sprinkle on the cheese, cut some Cilantro to go on top and then microwave that for 1 minute and it's mealtime :)

By choosing Spaghetti Squash over Spaghetti I am saving a ton of Calories and a ton of Carbs.  OK, not a ton, but A LOT!

1 cup of Spaghetti:  221 Calories & 43 Carbs

1 cup of Spaghetti Squash: ONLY 31 Calories & 7 Carbs!!!!!!!!!!!!!


By eating the Spaghetti Squash I'm also getting some great antioxidants: Vitamin A & Vitamin C, and also Lutein & Zeaxanthin, which protect the eye from age related diseases.

If protein is your thing, however, you'd get a lot more of that from the Pasta, so their are pros/ cons of making this switch.  For my priorities, this is a great deal!  

Here is a great article if you re interested in more details on the nutritional differences.

Thinking for tomorrow.....maybe a Peanut Satay Spaghetti (Squash) will be just the thing!  

Eat well and enjoy!

Tuesday, July 18, 2017

French Potato Salad


I didn't grow up enjoying traditional potato salad, but that all changed when a good friend of mine introduced me to "French Potato Salad".  YUM!  I fell in love and have never turned back!  Problem is that most people like your standard variety mayo based potato salad, so to enjoy this I typically have to make it myself.  It is more work than I like to do for a 'normal day', but once or twice a year, in the summertime, I start craving it and will eventually break down and make it if we are having guests over.   

This is a great side dish, which goes well with fresh sweet Corn, Pulled Chicken Sandwiches and a nice crispy green salad.  Ask your guests to bring the dessert and you are all set for a great summertime dinner on the patio :)

I'm not sure how 'authentic' my version is, but this is how I love it (husband does too!) and it's pretty close to the real deal.  And it's loaded with  all those Garlic & Onion Health Benefits! In fact: "Vegetables in the allium family have been linked to reduced risk for breast and colon cancers and contain a number of antioxidants, such as vitamin C and quercetin, which may have disease-thwarting and age-avenging properties."   

"Age-Avenging Properties?!?", how cool is that?  So eat up and enjoy!


Amy's French Potato Salad

It's best to make this early in the day, so it has time to cool down and the flavors to come together in the fridge.  And hey, one less thing to do later to get dinner ready!

Boil a bag of Small Yukon Gold Potatoes until just done.  While that is cooking away, add these items to a large glass bowl:

3 large garlic cloves, chopped
3 Tbsp Red Wine Vinegar
1-2 Tbsp Dijon Mustard (depending how spicy you like it)
8 Tbsp Extra Virgin Olive Oil
1/2 Red Onion, chopped
1 cup Scallions, chopped

Stir it all up until mixed well.
When Potatoes are done, drain them in colander and cover with a towel to steam 5-10 minutes.  When they cool down enough for you to handle them (but are still very warm!) chop them into large bite sized pieces and then toss them into the glass bowl with the sauce.  Stir well to ensure all the potatoes are covered.  Then toss in a cup of chopped Cilantro, and cracked Black Pepper and Salt to taste.  Mix it all up and put it into the fridge to cool down.

It may look a little messy, but you can throw a little more beautiful chopped Cilantro on top later before serving; this is total goodness; enjoy!


Thursday, June 29, 2017

Perfect Summer Appetizer: Tomato Olive Mozzarella Bites


Does anyone remember the movie MERMAIDS with Cher?  I LOVED that movie when I was younger.  Cher was the coolest, quirkiest, and prettiest mom and fed her girls all sorts of fingers foods for meals.  And THAT is what inspired me to make this appetizer!  (If you haven't seen the movie, please do).

I made this for the first time and brought it to a neighborhood backyard bbq and it was a hit!  This is a simple, yet delicious, and totally refreshing appetizer on a warm summer night, when you are chatting and waiting for the burgers and chicken to cook.  


Ingredients:
1 pint of Cherry Tomatoes, halved
1 pint of Fresh Mozzarella balls, halved
1 jar of Green Olives stuffed with Garlic, halved
Extra Virgin Olive Oil
Salt & Pepper Mill
Toothpicks

To Assemble:   
Use the Tomatoes and Olives as the 'ends' with the Mozz in the middle of the toothpick.  When plate is full, drizzle with the olive oil and crack the salt and pepper on top.  

DONE.  It is just that easy!   And you didn't even have to turn on the oven :)


Wednesday, June 28, 2017

Romaine Tuna Sandwich!

Romaine Tuna Sandwich

Refreshing!  Delicious!  And it whips up in seconds and is not hard to pack up and take with you to work or a picnic or wherever the day takes you!  Just pack up the tuna separately from the leaves and assemble when you are ready to eat.

I love Tuna - great protein and low calorie - a favorite combo of mine!   And it's tasty and you can mix it with all sorts of things.  I love it with Capers, but could not find any in the fridge, so today it's pretty basic, but still satisfying and yummy :)

Simply mix together:
1 can, Chunk Light Tuna packed in water
a drizzle of Extra Virgin Olive Oil
1 Tbsp Dijon Mustard
Salt, to taste
(add some Capers, if you have them!)

Then scoop this mixture into beautiful fresh sturdy Romaine Leaves.  Top with sliced Cherry Tomatoes, and serve with 1/2 Avocado, diced.

Did you know there is Protein in Romaine and more Vitamin A than a Carrot?! 

Clean Eating at its summertime best :)  And it's got all my 'must have's' for a great and healthy meal:

Protein
Veggies
Good Fats
Fiber
Yumminess

Enjoy!


Thursday, June 15, 2017

Veggie Plate: a Cool Meal on a Hot Summer Day

Veggie Plate, Cool Meal on a Summer Day


What turns a plate of Veggies (in this case: mushrooms, zucchini, and tomatoes) into a delicious meal?  In my humble opinion, any of these techniques will do:

-Browning/ Sauteing the veggies (don't be afraid of high heat)
-using plenty of good Extra Virgin Olive Oil
-Fresh Garlic
-Fresh sliced/ diced Onions
- and of course: SALT!

I made all these Veggies yesterday so today I was able to simply pull the Pyrex out of the fridge and plate it and sit down to enjoy.  Isn't it pretty?!  I think so :) and yes, it was delicious - due to the browning, the good EVOO, the garlic, the onions and the salt.

You may say:  where is the protein?!  Well it was a hot day and I wasn't all that hungry, but still, I never skip a meal; this was the perfect solution :)   After sitting down to eat it I thought....mmmm some nice Kalamata Olives would have been a great addition or some fresh Mozzarella, alas I had neither and survived with just the Veggies ;)

You know about "eating your water"?   That's a thing and very important in the summer heat.  This meal fits the bill!

Enjoy :)


Monday, June 12, 2017

Cauliflower "Rice" Teriyaki


Cauliflower "Rice" Teriyaki


Happy Monday :)  So this is my version of a "Cleanse" after a weekend away enjoying all sorts of indulgences:  a plate of veggies packing a lot of fiber and good fats and good flavor!  

I usually buy cauliflower and pulse it up myself in the food processor to make 'cauliflower rice', but this time I just picked up a bag from Trader Joe's ready to go - it makes throwing this meal together fast and easy!  

I simply heated the cauliflower rice with some grated carrots and a little Teriyaki sauce in a pan.  Then I topped it with 1/2 Avocado, diced, and the juice from 1/2 Lime.  Delish.

I've also been drinking water all morning.  I typically start off with a 16 oz glass of water every morning, before breakfast, and then another after breakfast. But after all the sodium and treats this weekend I'm drinking even more today!

If you aren't sold on all this water drinking, check out 6 reasons to drink water!


Wednesday, May 10, 2017

Easy to Peel Hard Boiled Eggs, for REAL

Lunch today: 2 hard boiled eggs, 1/2 avocado,
sauteed mushrooms and shredded Parmesan :)

Spring and Summer are a great time for hard boiled eggs…..as snacks on the go, deviled eggs for parties, egg salad, to throw on top of regular salads, or just on a plate, like today.  Always good, always full of protein, always filling and loaded with those great the super hero Vitamin D, that helps keep us happy!


Everyone knows how to make easy to peel hard boiled eggs now, right?  I’m only asking because it took me about two decades of making them on the reg, to find the answer!!!  There are so many ‘solutions’ floating around the internet on how to make hard boiled eggs easy to peel – but none of them worked for me Every. Single. Time.    Until now 😊

And it’s silly easy.  Steam them.  That’s it!   Fill a pot with 1 inch of water and then place a single layer of eggs into the steam basket inside the pot.  Cover.  Turn on burner and allow the eggs to gently steam for 12-20 minutes, depending on how much you like them done.

That’s it.

They are crazy easy to peel – no more egg peeling stress!!!! 😊😊  Mind you, I’ve done this about 50 times to ensure it really worked.  It works every single time on every single egg.

Enjoy!


Wednesday, April 19, 2017

Porcini Mushroom Ravioli and Salad Leftovers

Porcini Mushroom Ravioli


There is no lunch easier to assemble than simply combining leftovers from the night before.   Here is today's result; totally delicious!  Last night's Porcini Mushroom Ravioli, heated and served over last night's leftover Arugula Goat Cheese Salad.   This was so good together, that it's a good reminder to make a little extra every time you cook, so that there are leftovers to enjoy the next day!

Porcini Mushroom Ravioli (affordable at Aldi)
Boiled in salted water for 5 minutes, than tossed with 1 Tbsp of unsalted Butter, 1 Tbsp of Truffle oil (YUM) and topped with grated aged Parmesan.

Arugula Goat Cheese Salad
Baby Arugula topped with Red Grapes, toasted slivered Almonds and Goat Cheese, in a homemade dressing of Extra Virgin Olive Oil, Dijon mustard, freshly squeezed Lime juice, Garlic Powder and salt.


You get plenty of Veggie goodness here, as well as Nuts and Fruit and lots of Good Fats; enjoy!

Wednesday, April 5, 2017

My Delicious and Healthy Go-to Lunch this week!


This, always yum.  Well at least to me it is!  I've been eating this during the week basically every day the last week or two.  It's always good and always filling and always a healthy eating A+.  And perhaps best of all: it works as a breakfast, lunch or dinner!


2 scrambled eggs: hello delicious and high protein source of choline (you've heard how important choline is, right?)

topped with aged shredded Parmesan cheese: hello delicious, yet low calorie, high protein source of calcium!

1/2 Avocado, sliced:  hello delicious good fats and high fiber source!

1 cup of sauteed zucchini, diced and sauteed with fresh chopped Garlic: 5 surprising health benefits of zucchini, among them, weight loss - hello!

You can say "YUM" while patting yourself on the back for eating so well, your body will love you for it!

Enjoy :)

Thursday, March 16, 2017

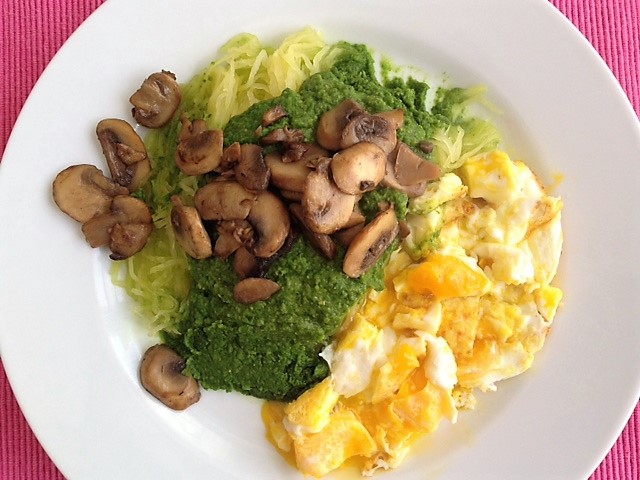
Spinach Pesto Hummus over Spaghetti Squash with Mushrooms and Eggs


After a girls weekend of well deserved decadence, I am trying to reboot my bod and eat "clean" this week.  For me this means eating healthy whole foods (read lots and lots of veggies!) prepared simply and preferably homemade.  

Everyone keeps saying to eat your greens for optimal health, but it's hard for me to get excited about salads in the winter. Luckily there are loads of ways to get spinach into warm meals and to reap all the great health benefits from this hard working green!

The idea for this meal struck while I was driving home from the grocery store: Spinach Pesto Hummus to go with my already cooked and ready to go Spaghetti Squash.  While making the Pesto I threw some mushrooms into a pan to cook along with some eggs.  The result was this colorful, yummy, high protein, high fiber, filling lunch!


Spinach Pesto Hummus Recipe:

Into food processor throw 2 large cloves of Garlic.  Chop completely and let sit for 10 minutes. Then add one bag of baby Spinach and 1 can of drained/ rinsed Chick Peas. While running processor stream in Extra Virgin Olive Oil until it takes on a hummus like texture.  You can add a little cool water in place of using too much oil, 1-2 Tbsp should be enough to make it smooth.  Salt to taste.

Tuesday, March 14, 2017

Vegetarian Black Bean Mexican Lasagna


You know all those broken little chips at the bottom of the bag?  This is a GREAT solution for using them up :)  I keep a little Tupperware in my pantry where I collect up all those little broken chips and when it fills up I know it's time to make some Vegetarian Mexican Black Bean Lasagna!  


Loaded with Veggies, this is not a lasagna you need to feel guilty about.  Zucchini, Mushrooms, Onions, Garlic, Black Beans and Corn, are all layered with Salsa, toasted Corn Tortilla chips and little shredded Cheddar on top to increase the yum factor.  Here is how I do it:

Ingredients:

1 Tbsp Extra Virgin Olive Oil
3 Zucchini, diced into very small pieces

1 Onion, diced
1 pint sliced Mushrooms, chopped even smaller
2 large cloves of Garlic, chopped
1 tsp Cumin

1/2 cup frozen Organic Corn, thawed
1 can Black Beans (drained/ rinsed)
handful Cilantro, chopped

2-3 cups broken Corn Tortilla chips
Salsa, whatever type you like
1 cup Cheddar Cheese, shredded (1/2 cup should be enough if you are looking to cut fat and/ or calories!)


#1.  Preheat oven to 350, and make the Veggie medley: into a hot pan add the oil.  Give it a minute to heat up and then add the diced Zucchini.  It should sizzle when it hits the pan!  Saute for several minutes, stirring occasionally, allowing the Zucchini to brown.  Then add the Onions, Garlic, Cumin, Mushrooms and allow it all to cook and soften a bit and become aromatic.  Then add the Corn and Beans, stir and remove from heat.  Top with Cilantro.

#2.  Spray or brush a casserole pan with Canola Oil.  Use half your broken chips to cover the bottom.  They form the bottom "crust".

#3.  Pour Veggie medley on top of chips.


#4.  Top Veggie medley with Salsa (as much or as little as you like.)


#5.  Top with the remaining Chips and shredded cheddar.  Bake for 30 minutes.  If not brown enough on top you can broil it a couple minutes at the end of cooking.    Serve with Avocado and a couple dollops of Plan Greek Yogurt and a little more freshly chopped Cilantro.


Monday, February 13, 2017

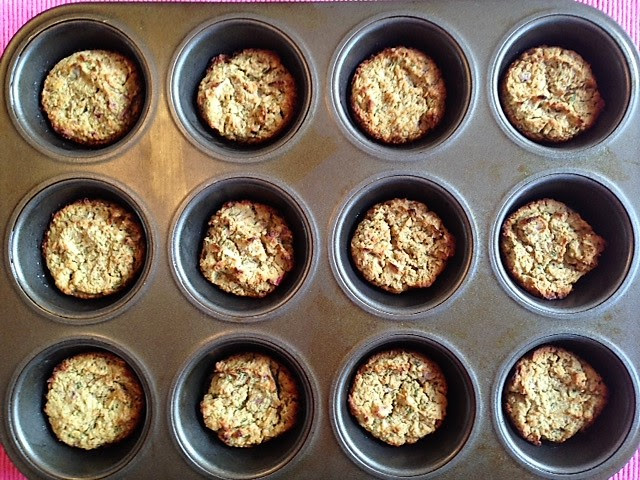
Baked White Bean Falafels


Baked White Bean Falafels: Easy to make, easy to transport for picnics, or school and work lunches, loaded with super healthy good for you stuff! and full of flavor!  You can eat them alone, or dipped in yogurt, or in a Pita sandwich.  Or you can eat them like I did today, and just toss a few on top of a garden salad, YUM!

I have always loved Falafels....deep fried balls of garlicky spicy chick pea goodness nestled inside warm pita with cucumbers and red onion in a tahini yogurt dressing; oh so good!!  

Yesterday I was watching a great food show with my kids about a culinary trip through Egypt, down the Nile.  Though Falafels are often believed to be Middle Eastern Cuisine, the Egyptian chef claimed they were originally created there and made with Fava Beans.  Well I won't nitpick the facts here, but simply put, it had me craving some Falafel stat! 

So I went about making a healthier (not deep fried) homemade version for everyday life.  I made them with white beans (instead of chick peas) simply because that is what I had left in the pantry this morning, but feel free to use the real deal (chick peas or fava beans depending who you ask!) if you have it handy.


Amy's Baked White Bean Falafel Recipe

Preheat oven to 425 degrees

Drop 3 large cloves of Garlic into a running food processor
Let it sit 5-10 minutes

Then add to food processor:
1 Onion, chopped into big chunks
1 handful of fresh Cilantro
1 Tbsp Cumin
1 tsp Salt
2 Tbsp Flour
1 can White Beans (or Chick Peas/ Fava Beans, drained/ rinsed) 

Process everything until it takes on a grainy texture. 
Brush Olive Oil on the bottom of a 12 cup muffin tin.  Spoon mix into the 12 cups.  Brush the top of each with a little more olive oil.

Bake for 30 minutes and done!  Crunchy on the outside and soft on the inside, enjoy! 


White Bean Falafel, before baking
White Bean Falafel, after baking
Baked White Bean Falafel, ready to eat!


Thursday, February 2, 2017

Scrambled Egg with Spinach Artichoke Dip on Corn Tortillas


Scrambled Eggs with super healthy Spinach Artichoke Dip on toasted Corn Tortillas = totally delicious healthy filling warm meal.   I love dips and Spinach Artichoke is one of my favorites!  I have done lots of tweaks and made lots of versions of this dip throughout he years, but this week I went super healthy and eliminated all the mayo!  Yup, but guess what....it was still really really good; I'm converted.

Amy's Super Healthiest yet Spinach Artichoke Dip:

3 large cloves of garlic
1 box frozen Spinach, thawed, with liquid squeezed out
1 can of Artichoke Hearts, drained
2 large scoops of Whole Fat Plain Yogurt
1 cup Parmesan Cheese

Drop Garlic into running food processor, letting it sit for five minutes to reap the best nutritional benefits!  Then drop the rest of the items into the food processor and pulse until you get the texture how you like, somewhere between chunky and smooth; I like it chunky!

Put into a greased oven safe pan and cover and bake at 350 for 30-40 minutes.  Remove the lid and bake another 10-15 minutes so the top can brown a little bit.

Eat with your favorite dippables OR mix it into scrambled eggs like I did here and wrap up all up into delicious toasted Corn Tortillas!  YUM.


Thursday, January 19, 2017

Salad Bar Love


Yesterday I ate BOTH of these salads for lunch!  Yes, all true, and all made possible by the beloved salad bar, replete with options and "all you can eat" encouragement.
  
I have always been a salad bar lover.   Way back in the days my favorite was at Pizza Hut!  Do they even still do that?  My brother would laugh at me and my love of what I called "The Crunchy Salad" which was basically some greens and tomatoes topped with hard boiled eggs, shredded cheddar and everything crunchy: Bacon Bits, Croutons, Chinese Noodles, Seeds...  Obviously my healthy eating habits have come a long way!   But my love for the salad bar and picking and choosing, not to mention 'all you can eat', has never wavered.

So today I want to give a shout out to Ruby Tuesdays and their new Garden Bar for continuing the salad bar tradition, and recently improving and increasing the delicious and healthy options!  

I was there yesterday and for $10 I enjoyed two salads filled with veggies and low fat proteins, as pictured above.  I left feeling good and full, but not bloated or needing a nap, as I did a good job avoiding the simple carbs available: the pasta salad, croutons and fancy crackers were not needed or missed!

It's still love some crunch on my salad, and in this case the flavorful seed mixture did the trick.   Can't wait to do it again soon!

Trying to remember all the ingredients I had is hard a day later and not everything is visible from the picture because I really loaded up the plates :)   

My go to's:  Lettuce, Tomatoes, Carrots, Red Onions, Mushrooms, Cucumbers, Zucchini, Hard Boiled Eggs, Sweet Green Peas, Sunflower Seeds

New exciting stuff:  Roasted Corn, Black Beans, Roasted Zucchini, Flavorful Seed Mixture, Hummus, Fresh Salsa

There are 55 ingredients in all!  And if you are wondering, no, I'm not being compensated by Ruby Tuesdays, I simply want to spread the word to ensure it continues, because it's my favorite salad bar option outside my own home!

Enjoy :)

PS.  They offer lots of coupons, so grab one before you go!


Monday, January 9, 2017

Turmeric Hummus


Have you been hearing all the hype about Turmeric lately?  I have and I'm heeding the advice to eat more for better health; check it out:  10 Health Benefits of Turmeric.

I've been adding it to pizza sauce and sauteed veggies a couple times a week for good measure, but today I thought I'd give it a try in a homemade Hummus.  DELISH!  And it's super easy to add it, just sprinkle it in!!  Below is my recipe that results in a super velvety yellow hummus.


Turmeric Hummus 

Coat the bottom of a heated pan with Extra Virgin Olive Oil.  

Toss in 3 cloves of Garlic, sliced, along with 1 tsp Turmeric and a couple twists of the Salt mill; stir.

Saute for a few minutes until wonderfully aromatic (making sure not to burn the garlic!)  

Then add a can of rinsed and drained Chick Peas to the pot.  

Let it sizzle while stirring for a couple more minutes, then add 1/2 cup of water.   

Simmer this mixture for 10 minutes; this allows the flavors to come together while helping the chick peas get nice and soft for that velvety texture!

Turn off heat; let it sit.

After 15 or so minutes sitting, add to the food processor.  

To the processor add the juice of 1/2 fresh Lime (I sub Lime for Lemon all the time in all sorts of things, they are largely interchangeable.)

Add 2 Tbsp Tahini and more salt, to taste.

Process until it reaches desired consistency.  If it seems too 'thick' and not soft and velvety enough, feel free to add a little cold water, 1 Tbsp at a time.

Serve with baby carrots, cherry tomatoes, zucchini rounds, cucumber, snap peas, or crackers, pita...... basically whatever you like to dip into hummus!

Enjoy :)


Friday, January 6, 2017

NO Guilt Onion Dip!

NO Guilt Onion Dip


Last summer I was at a friends house and her daughter made us an Onion Dip.  I LOVE Onions and I LOVE dip; so I was thrilled!  

When she served it though, it looked quite different than any Onion Dip I had ever seen.  But guess what?  It was AMAZING!!  I think four of us finished the whole dish in under 10 minutes.  I got the recipe of course - only three ingredients:  1 Sweet Onion, Swiss Cheese and Mayo, that was it!  Oh, it was soooo good.  

BTW, did you know how great Onions are for you?  Check it out here.  In a nutshell: they improve immunity, regulate blood sugar, reduce inflammation, heal infections, lower bad cholesterol, and play a significant role in preventing cancer, among many other health benefits!

So anyways, yesterday I was dreaming about this dip, and decided to try making a similar NO guilt version for my Girls Night Out.   I admit the result looked and tasted a bit different than the original, but it was still really really good and my friends liked it enough to ask for the recipe!  So here it is:


No Guilt Onion Dip

Preheat oven to 350.
Into a large glass bowl add:

1 package frozen Spinach, thawed, with all the excess liquid squeezed out
1 large Sweet Onion, chopped
1 cup freshly grated Cheddar Cheese
1/2 cup Olive Oil Mayo
1 Tbsp Water
1/2 cup Parmesan Cheese
1/2 tsp Garlic Powder


Mix everything together and pour into casserole dish.  Cover and bake for 30 minutes.  Remove cover, raise heat to 425 and bake another 10 minutes or so, until the top is bubbly and beginning to brown.


Serve with with your favorite dippables - YUM!  And PS.  It goes great with a nice glass of Red Wine!


Note:  It's hard to not call it Spinach Dip, because that is how it looks, but the flavor is undoubtedly and predominantly that of delicious sweet Onion cheesiness.


Enjoy!


Thursday, January 5, 2017

Germ Busting Orange Carrot Smoothie!

Germ Busting Orange Carrot Smoothie

So it's that time of year again:  germ season!   A few years ago I was giving my boys a smoothie every single morning and they didn't get sick once.  I'm convinced that is no coincidence! I'm doing it again this year - so far, so good!   

This is a super easy germ busting smoothie recipe and they both LOVE it = win win!    

Germ Busting Orange Carrot Smoothie (serves 2)

Put into blender in this order:

14 organic baby carrots
1 banana
1/2 cup orange juice
1/2 cup water
1/2 cup Organic Whole Milk Vanilla Yogurt

Blend on "smoothie" setting for about a minute to get it smooth :)  Then pour and enjoy!


I feel confident calling this a germ busting smoothie because:

1.  Yogurt is a Power Food that Boosts Immunity!

2.  Orange juice boosts immunity with its Vitamin C!

3.  The Beta Carotene in Carrots boosts immunity!


Try it out and let me know what you think!